

Client Situation
You have been hired for an internship with LDS Church Magazines and your first project is to write and design a two-page magazine spread for the Ensign or New Era. This project could very well launch a new career if you combine good writing skills with the design principles to create an engaging piece that will communicate your message to the target audience. Your spread may be an inspiring personal experience, or an instructional infographic-style article.
Note: This assignment is part 1 of your Magazine Spread Project that is due in week 12. For this week, you will prepare the content and post it in a preliminary blog post.
Preparation
Instructions for Step 1. Magazine Spread Content & Sketches
WRITE YOUR STORY AND GATHER YOUR IMAGES/ILLUSTRATIONS: This is your opportunity to write that inspiring, personal spiritual experience or tell the story of someone you know, with permission of course. You may also choose to write an article that would be more like an instructional infographic of fascinating facts, or even a “how to” guide about a gospel topic. Write 400-800 of your own, original words and find at least two images/illustrations. You may include up to 75 words of quoted material.
TOPIC SELECTION: Start by determining who your audience is. Are you writing for the Ensign or New Era? Be certain your story is age and audience appropriate for LDS magazines. Study recent Ensign and New Era articles here for guidance.
BYU-I WRITING CENTER: Be sure you find someone you trust with good writing/editing skills to help you perfect your writing, grammar, and story. Online students can get help with writing and editing from the BYU-Idaho Writing Center.
IMAGES/ILLUSTRATIONS: Choose a color scheme (Complementary, triads, split complement triads, analogous, etc). View the Sample Magazine Spreads for ideas above and in Week 12 > Magazine Spread Project Overview. Create or select images or illustrations to fit your color scheme. You may use your own original images or illustrations; ask a friend to provide images or illustrations; or find appropriate, high-res images online. Look for images that fit For a full page image, the long side should be about 2500-3500 pixels: How to find quality images online (How to Find Quality Images Online Transcript)
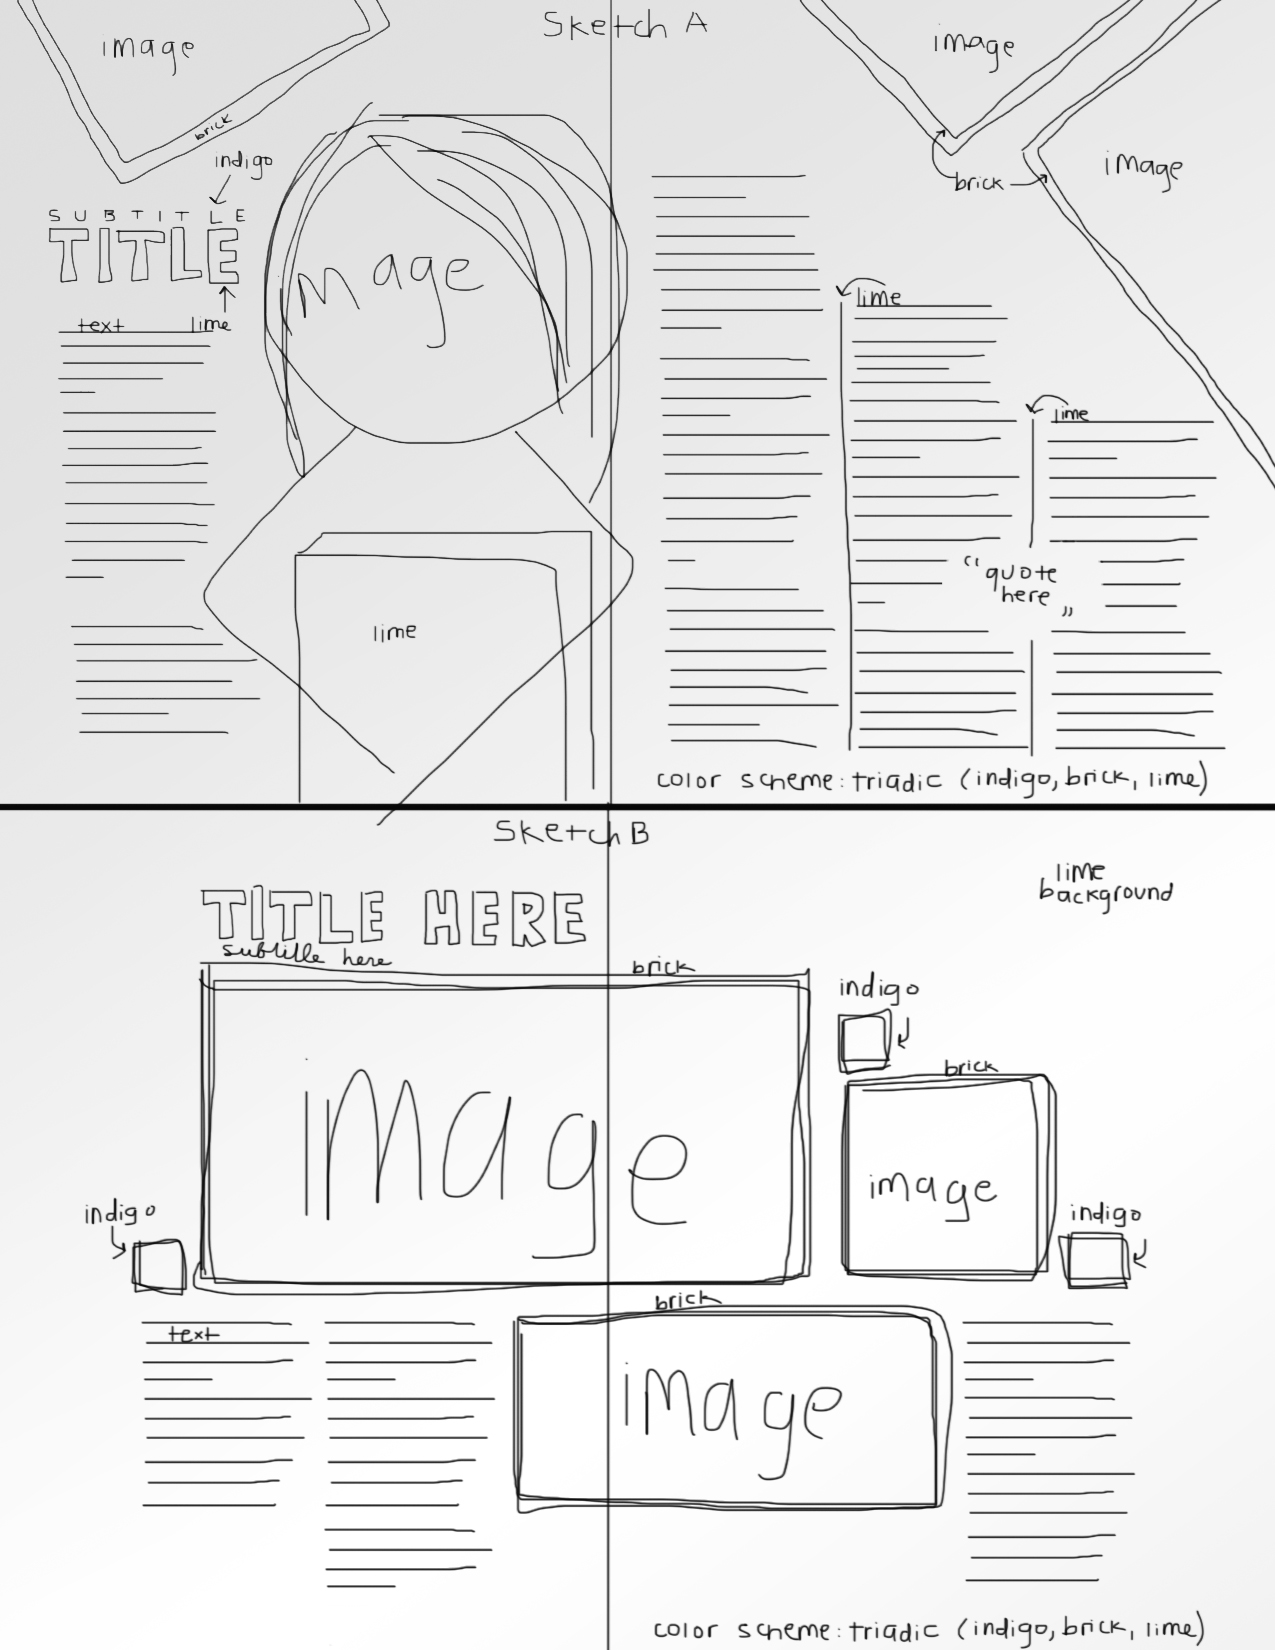
SKETCHES: Once you have your content (story and images) you should make sketches of at least two different two-page layouts with paper and pencil. Fold an 8.5×11 piece of paper in half, then draw Sketch A on the top half and Sketch B on the bottom half to show both two-page layouts. Label them Sketch A and Sketch B. Make each sketch look like this. the example to the right. Look at the Sample Magazine Spreads for ideas, colors, and layout ideas. List your color scheme and make color notes to show where your colors will show up in the layout. Be sure to repeat the colors at least twice in your layout. Do not copy another layout exactly, but use it as a springboard for your own design. Plan your focal point and hierarchy. Take a photo of your sketches to insert in your blog post. (Click image to enlarge)

Sketch A and Sketch B
Include the following elements in your sketches page:
1. One page with 2 two-page layouts, labeled Sketch A and Sketch B
2. Large eye-catching title, with one or two dominant “theme words.”
3. Text boxes or lines to represent the text
4. Image shapes.
5. Graphic elements.
6. List your Color Scheme (See Visual FOCUS p. 126 – 155) and add color notes on various elements.
BLOG POST: Match the formatting of this Sample Blog Post. Create a new blog post with an introductory paragraph about the magazine spread project. Add your story, images/illustrations, and your sketches. Include the image source information.
SUBMISSION: Find more details in Course > Blog Post: Submission Instructions
View 7A blog post example here.
1. Go to project submission and attach the SCREENSHOT of your blog post.
2. Then you will be able to insert a working HYPERLINK to your blog.
Rubric
NOTE: Meeting the minimum requirements is “average” and constitutes an 80% or B- grade, according to the University Grading Guide. To receive a higher grade, students should excel.
√ Sketches: At least two different two-age layouts; label sketch A & B; large eye-catching title; text boxes or lines to represent text; image shapes; graphic elements; color scheme & color notes; colors repeated at least twice
√ Requirements: 400-800 of your own, original words (no more than 75 quoted words); at least two images/illustrations; Design principles.
√ Blog Post: Introductory paragraph; story; images/illustrations displayed at Large size; images are clickable; sketches; links to image source
√ Submission: Screenshot of entire blog post and working hyperlink to blog post.
CAUTION: your assignment is not complete until you submit a link to it here. However, you are allowed a one-time extension, if you choose to use your mulligan. (See syllabus). We check your blog post for completion right at the deadline, so please do not add things after submitting your link, until it has been graded.